Table of Contents
Edit View
Edit View allows you to change the name and properties of a ChartList. It also lets you do “bulk” operations on the charts in a ChartList. For example, you can use Edit View to delete several charts all at once instead of deleting them one at a time.
Check out our video about using Edit View to edit the charts in your ChartLists, or read on for more details.
Accessing Edit View
To bring up a ChartList in “Edit” view from the SharpCharts Workbench, just click on the “Edit List” link located above the chart. If you are already looking at your ChartList in one of the view formats, you can simply select “Edit” from the “View List As” dropdown at the top of the page.
Once you have your ChartList in “Edit” view, you can use any of the controls described below to change the contents of your list.
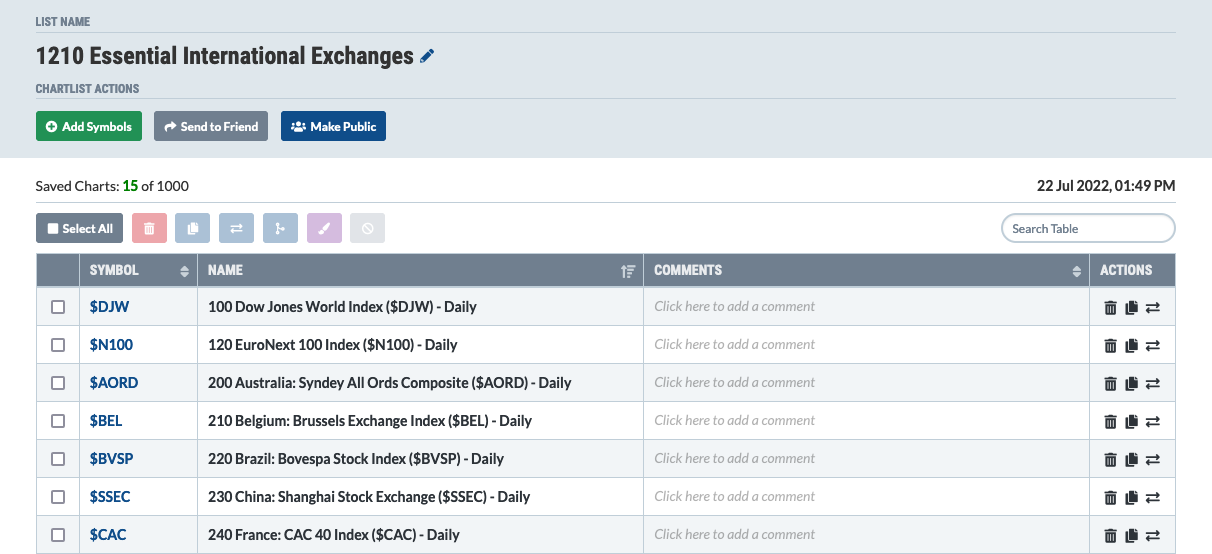
ChartList Properties
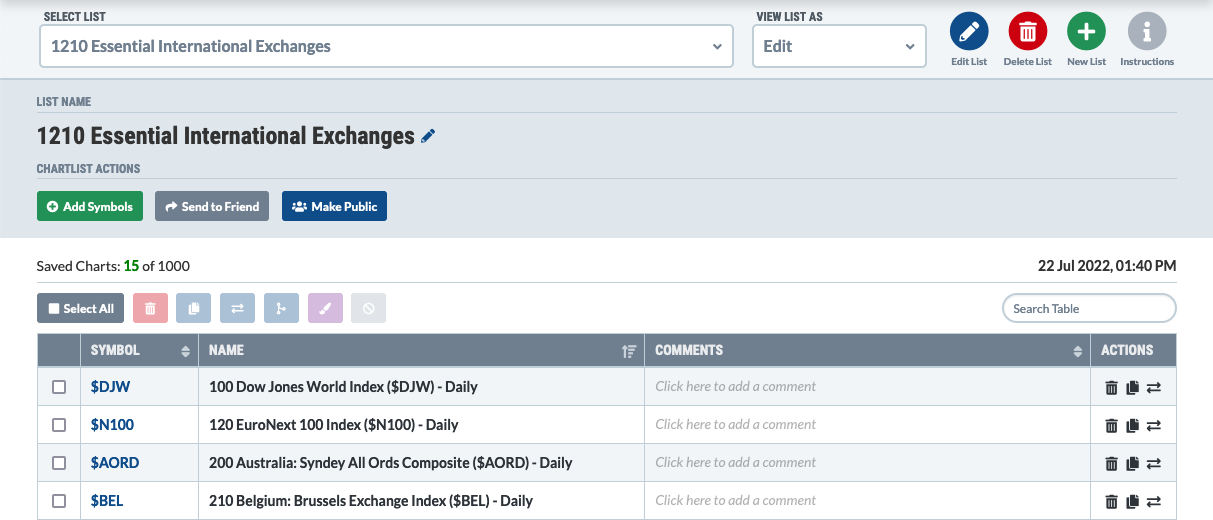
From this page, you can edit the name of your ChartList and add additional notes about it. The ChartList name is located at the top of the page, while the ChartList notes are at the bottom. The process for updating either one is the same: click on the existing text, make your changes and click the “Save” button. For both the List Name and Notes, you can add formatting to the text via the use of special tags:
- bold - add <b> before the text and </b> after to bold the text
- italics - add <i> before the text and </i> after to italicize the text
To make your ChartList viewable to the public, click on the “Make Public” button at the top of the page. You'll need to fill out some additional information about your ChartList before you can make it public.
Learn More: Public ChartLists
To share your list with a specific StockCharts user, click the “Send to Friend” button at the top of the screen. Type the email address of your friend into the popup box and click “Send to Friend.” Your friend will be sent an email with a link which will allow them to have your ChartList copied to their account. The request is valid for five days. You will receive a confirmation email when your friend has copied the ChartList.
Note: Any subsequent changes you make to the ChartList will not be reflected in your friend's copy.
Step-By-Step Instructions: Sharing a ChartList
Adding Charts to a ChartList
Additional charts can be added to your ChartList at any time by clicking the “Add Symbol” button at the top of the page. Click the appropriate tab to enter symbols one at a time, many at a time, by adding all members of a group, or by uploading a CSV spreadsheet of symbols.
Reminder: A maximum of 1000 charts can be saved to each ChartList. Once the ChartList has reached that limit, no more charts can be saved until some are removed from the list. A notification will be displayed at the top of the Edit View page if you have reached this limit.
One at a Time
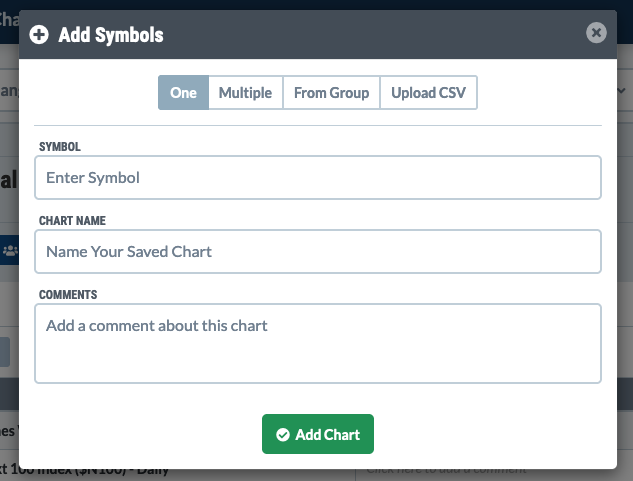
Inside the “One” tab, you can add charts one symbol at a time by entering the ticker symbol and, optionally, a chart name and comments. Click “Add Chart” when you're done. A chart with your default ChartStyle will be added to the ChartList. If you have not specified a chart name, the company name will be added.
Many at a Time
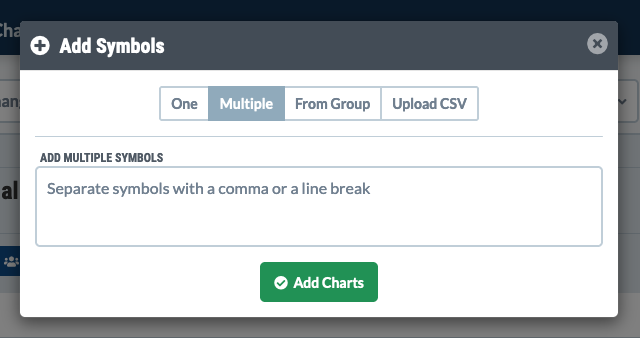
Inside the “Multiple” tab, you can add charts for multiple symbols at once. Just enter the ticker symbols, separated with commas. Click “Add Charts” when you're done. A chart with your default ChartStyle will be added to the ChartList for each symbol on the list. A generic chart name will be used for each chart.
From a Group
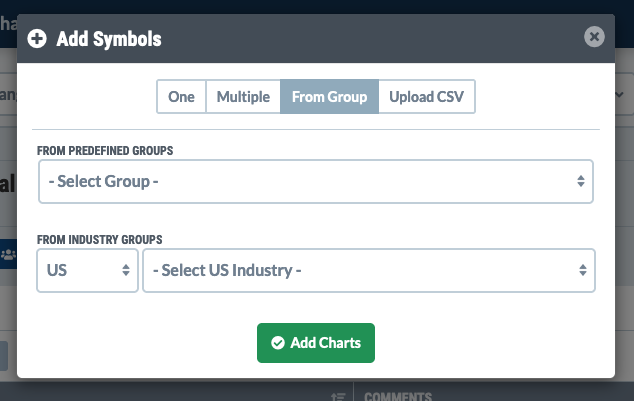
Inside the “From Group” tab, you can add all the symbols from a specific group or industry to your ChartList. To add members of a group, select the group from the “Predefined Groups” dropdown menu, then click the Add Charts button. To add members of an industry group, select the country (US or Canada), then select the industry from the Industry Groups dropdown and click the “Add Charts” button. A chart with your default ChartStyle will be added to the ChartList for each symbol in the group. A generic chart name will be used for each chart.
From a File
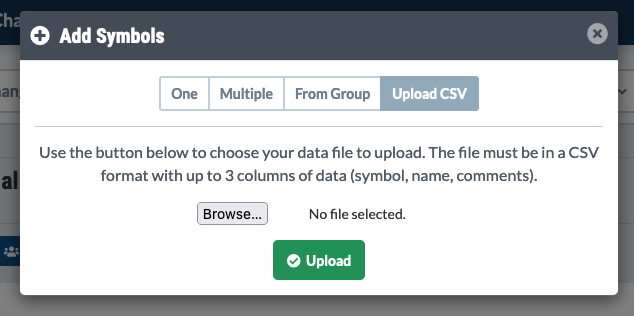
Inside the “Upload CSV” tab, you can add all the symbols in a CSV (comma-separated values) file that you create. The file must be in CSV format with no more than three columns of data. The first column must contain the ticker symbol; the second and third columns are optional and may contain the chart name and chart comments.
Once your CSV file has been created, click the “Choose File” button and select your file, then click the “Upload” button. You will be asked to confirm the symbols you are adding (near the bottom of the popup). If everything looks correct, click “OK.”
A chart with your default ChartStyle will be added to the ChartList for each symbol in your CSV file. A generic chart name (e.g. “AMZN - Amazon.com, Inc.”) will be used for any symbols that did not have a chart name specified in the file.
Step-By-Step Instructions: Uploading From a CSV File
Selecting and Editing Individual Charts
The charts in your ChartList are displayed in a table like the one below. From this table, you can make changes to an individual chart or select multiple charts to update at once.
To update the Name for the saved chart, hover over the name and click on the Pencil icon next to the chart's name in the table. Update the chart name and/or comments, then press Enter or just click elsewhere on the page. Press the ESC key to exist without making changes. The chart's Comments can be changed in the same way; just hover over the comments and click the pencil icon. Clicking on the Symbol will display the chart in the SharpCharts Workbench, where you can edit the chart itself.
You can also select multiple symbols in the table, then update all of the selected symbols at once. To select a chart, click the checkbox for that row in the table. To select all the charts in the ChartList, click the Select All button above the table.
Editing Multiple Charts
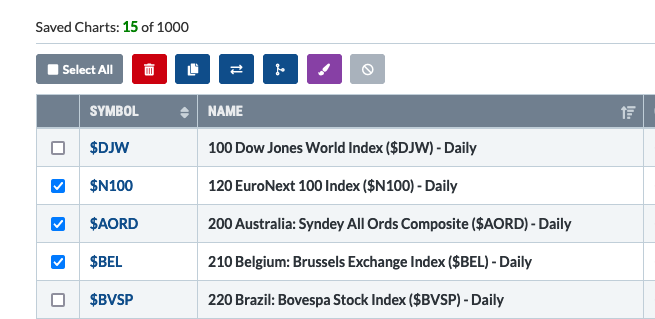
If you have selected any charts using the checkboxes at the left side of the table, then the row of buttons above the table becomes available. These buttons allow you to make updates to multiple charts at the same time.
- Select All - This first button is available at all times and is used to quickly select all the charts in your ChartList.
- Delete - This button will delete all the charts you selected in the table from your ChartList.
- Copy To - This button will copy the selected charts from the current ChartList to another ChartList you select.
- Move To - This button will remove the selected charts from the current ChartList and move them to another ChartList you select.
- Merge Into - This button will copy the selected charts from the current ChartList to another ChartList you select. This differs from the “Copy To” functionality in that the chart will not be copied to the target ChartList if a chart for that symbol already exists in the target ChartList.
- Apply Style To - This button will allow you to apply one of your saved ChartStyles to all the selected charts.
- Remove Numbers From - This button will remove any numbers from the beginning of the selected charts' names.
Step-By-Step Instructions: Deleting Charts