Table of Contents
Advanced Scan Workbench
Scans are an invaluable resource for technical analysis, allowing you to envision a desirable chart and discover it in the real world. The Advanced Scan Workbench helps you achieve this goal, giving you the tools you need to build, test and run complex scans and save them for later use.
Available only to our members, the Advanced Scan Workbench is for users who desire complete control over the Scan Engine. This allows for virtually any form of criteria, rather than simply the most common forms that are provided in the Standard Scan Workbench. The Advanced Scan Workbench can do all the things that the Standard Scan Workbench can do, with several important additions, such as:
- Creating conditions with multiple indicators on each side of the Comparison Operator.
- Creating scans that join different conditions together with “OR” logic.
- Modifying more of the scan parameters.
- Specifying the sort order of results.
- Displaying extra fields in the scan results.
Check out our Advanced Scan Workbench overview video below, or just read on to learn how to get the most out of the Advanced Scan Workbench.
This article will introduce you to the main features of the Advanced Scan Workbench, but does not cover the details of writing scans. For more information on using our scan “language,” please see our Writing Scans article in the Support Center. In addition, check out our Scan Syntax Reference to learn the specific syntax for each scan clause we support.
Accessing the Workbench
To access the Advanced Scan Workbench from Your Dashboard, click the “Advanced Scan Workbench” link in the “Member Tools” section or click the “New Scan” button in the “Your Scans” section of the page.
You can also access the Advanced Scan Workbench from any page by clicking on your name in the top right corner and choosing “Your Scans” from the dropdown menu.
Parts of the Workbench
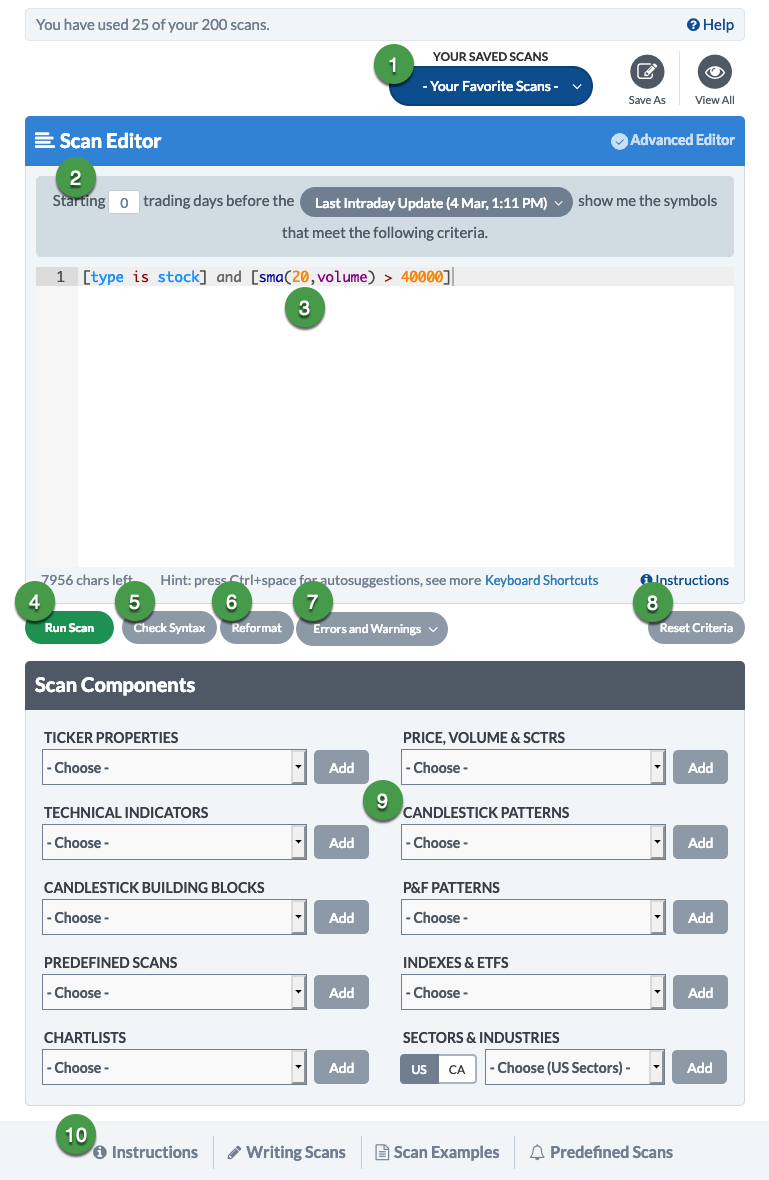
- Scan Management
- Starting Date Adjuster
- Scan Editor Box
- Run Scan Button
- Check Syntax Button
- Reformat Button
- Errors and Warnings Selector
- Reset Criteria Button
- Scan Components Area
- Additional Resources
The use of each of these sections is described below.
Building a Scan
The Scan Editor Box
The Scan Editor Box contains the criteria used to run the scan. All scan clauses must be entered in this box in order to be part of your scan.
When you first create a new scan, there are a couple of clauses already entered in the Scan Editor box, which represent default filters that are often used in scans. You are free to modify or remove these criteria from your scan. Additional scan clauses can either be typed in by hand or inserted from the Scan Components area.
Tip: If you find yourself entering the same starting scan criteria over and over again, put those criteria in a saved scan so you can easily call them up each time you start a scan. See our Scan Templates article in the Support Center for step-by-step instructions.
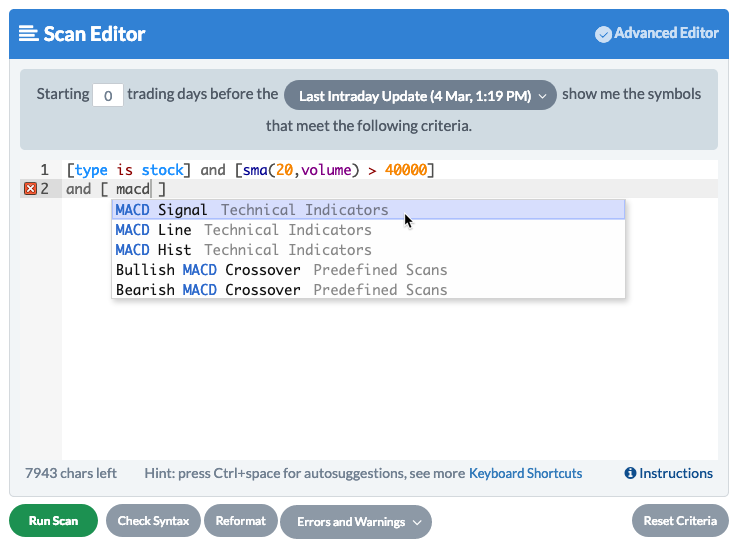
Our Auto-Suggestions feature makes typing scans by hand easier than ever before. Once you start typing in the Scan Editor Box, the feature will automatically suggest possible clauses for you in a dropdown menu, as shown below. You can select the clause you want with your mouse or with arrow keys. Once the option you want is highlighted in blue, press the Enter key to insert the clause in your scan. If the dropdown menu is not appearing, both Windows and Mac users can click Ctrl+Space to launch the auto-suggestions dropdown menu.
Note: The Auto-Suggestion feature is not available on some older browsers, including all versions of Internet Explorer.
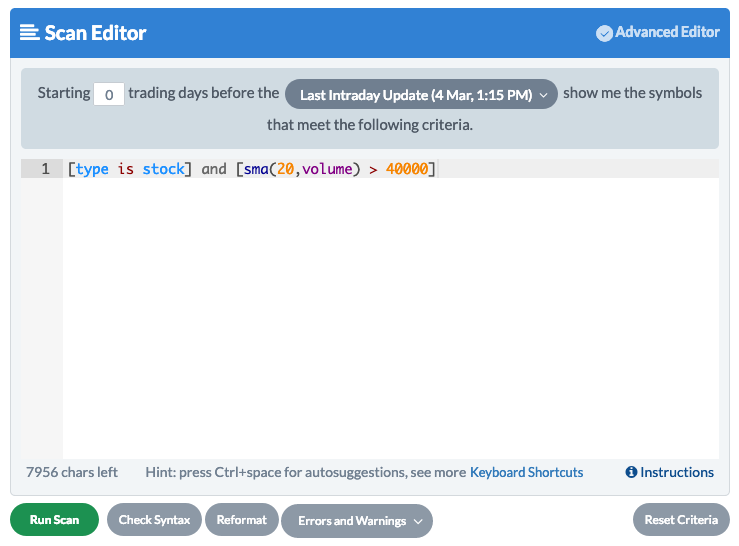
Scans can be a maximum of 8000 characters long; a message below the Scan Editor Box shows you how many characters you can still add to your scan. Clicking the “Reformat” button, located at the bottom of the Scan Editor Box, will automatically format the clauses in your scan, putting each clause on its own line. This can help you quickly clean up a messy scan.
Note: The Reformat feature is not available on some older browsers, including all versions of Internet Explorer.
If at any point you want to start over, clicking the “Reset Criteria” button below the Scan Editor Box will clear all scan criteria out of the box and reset it to the default criteria.
The Advanced Scan Workbench offers two ways to check for errors in the syntax of your scan: the “Check Syntax” button (below the Scan Editor Box) and the in-line error and warning messages (to the left of each line of the scan). See the Checking Syntax section later in this article for more details on checking your scan clause for errors.
Learn More: Scan Syntax Reference
Scan Components

The Scan Components area can be used to insert common clauses into the scan you are building. This is handy when you're not sure of the exact syntax to use, allowing you to quickly enter the clause and ensuring that the syntax is correct.
These clauses are broken down into several different categories, each having its own dropdown menu in the Scan Components area. Once you select a clause from one of the menus, click the “Add” button to append the clause (with its default settings) to the scan in the Scan Editor Box with its default settings. You can modify these default settings by hand in the Scan Editor Box.
The Scan Components categories are listed below. For more details on the specific clauses and their syntax, please click the link to go to the appropriate section of the Scan Syntax Reference:
- Ticker Properties - Clauses for filtering by security type, symbol, name, country, exchange and more.
- Price, Volume, and SCTRs - Clauses for standard price and volume measurements (OHLC values, all time highs, volume, liquidity, etc.). Also includes SCTR ranking clauses.
- Technical Indicators - Clauses for several popular technical indicators. Also includes clauses for standard arithmetic functions, such as min/max and percent change; see the Technical Functions section of the Scan Syntax Reference for details on these functions.
- Candlestick Patterns - Clauses for common bullish and bearish candlestick patterns, such as hammers or morning stars. Also includes Elder Bar and Ichimoku Cloud patterns. These are all true/false clauses, which indicate whether the pattern is currently present for that stock.
- Candlestick Building Blocks - Clauses for more discrete candlestick patterns, called candlestick building blocks. They include everything from dojis to spinning tops. These are all true/false clauses, indicating whether the pattern is currently present for that stock.
- P&F Patterns - Clauses for standard bullish and bearish P&F patterns, such as bullish triangles and double bottom breakouts. These are all true/false clauses, indicating whether the pattern is currently present for that stock.
- Predefined Scans - Clauses for several popular bullish and bearish technical indicators that are found on our Predefined Scans page, from MACD crossovers to 52-week highs/lows.
- Indexes and ETFs - Clauses to filter stocks by membership in various indexes (e.g. limiting to stocks that are in the S&P 500), as well as ETF clauses that allow you to limit your results to non-inverse or leveraged ETFs.
- ChartLists - Clauses to limit your scan results to stocks that are in a particular SharpCharts or StockChartsACP ChartList. In the scan clause, the ChartList will be identified by number, but there will be a comment to the right of the clause that shows the ChartList's name.
- Sectors and Industries - Clauses that limit your scan results to stocks that are (or are not) in a particular sector or industry. We currently offer scanning for US and Canada sectors and industries only. Be sure to select “US” or “CA” before choosing a sector or industry from the dropdown menu.
Managing Your Scans
Once you've built your scan, saving the scan criteria allows you to reuse your custom scan any time you want without having to reenter all the filters. Only StockCharts members can save custom scans. Basic members can save just 1 custom scan, while Extra members can save up to 200 custom scans on their account and Pro members can save up to 500. The number of scans you have available will be displayed at the top of the Advanced Scan Workbench.

The Scan Management area of the Advanced Scan Workbench allows you to add, modify, delete and view your saved scans.
When you first create a new scan, you can save it by clicking the “Save As” icon in the Scan Management area. You will be prompted to enter a name for your scan. Choose a name that will help you find it again later. Your scans will be listed alphabetically by name, so you may want to add a prefix to each scan name in order to group your scans by the main indicator used or, alternately, by bullish vs. bearish scans. (Use whatever form of organization is most useful to you.)
To load a saved scan in the Advanced Scan Workbench later, click the “Your Favorite Scans” dropdown menu in the Scan Management area and find your scan on the list. Scans are arranged alphabetically by scan name. You can tell which saved scan is loaded in the Scan Editor Box, as the name of the currently-loaded scan will be displayed in this dropdown box.
Learn More: Export a Standard Scan to the Advanced Scan Workbench
If you make changes to your saved scan, you can save the changes by clicking the “Save” icon in the Scan Management area. If you want to save a copy of the scan, you can click the “Save As” icon and specify a different name for the new copy of the scan. To rename your scan without creating a new copy, click the “Rename” icon and specify a new name for the existing scan.
In the event that you no longer need a scan, you can delete it by loading it in the Scan Editor Box and clicking the “Delete” icon in the Scan Management area.
To view all your saved scans on a single page, click the “View All” icon in the Scan Management area. This page will display the scan name and syntax for each of your saved scans. If you wish to remove one or more scans from this view, you can check the box to the left of the scan's name and click the red “Delete Selected Scans” button to easily delete them from your account.
Using Your Scan
Once your scan has been built, running it will be fairly simple. However, there are a couple of steps you might want to take before pressing the “Run Scan” button.
The Starting Date Adjuster

Before running your scan, you can use the Starting Date Adjuster to specify which day of data the scan will be run against. This can be used to see historical signals or results for a scan - that is, what results it would have returned at some point in the past.
The default setting is 0 days before the Last Intraday Update (during market hours) or Last Market Close (outside of market hours). Most of the time, you'll want to find stocks that meet the criteria right now, so the default settings will be just fine.
If you need to change the settings, you can specify that your scan start up to 3000 trading days (roughly 12 years) in the past. Keep in mind that, depending on your scan criteria, the further back you go, the less accurate your results will be. Specifically, exponential moving average calculations require a larger number of data points to be accurate. EMAs with large offsets are prone to inaccuracies.
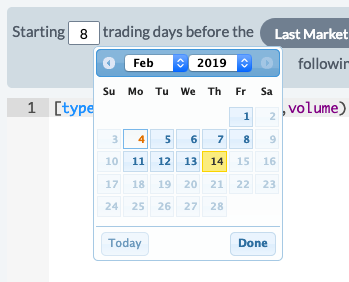
When you click in the “Starting” box, a popup calendar will display the associated date for that offset value (the offset date has a white background and orange text). Alternately, if you click on a date in the calendar, that offset will be put into the “Starting” box. The offset will be relative to either the latest intraday update or the last close, based on the selection in the dropdown menu.
Note: The Scan Engine will only run the scan on one date at a time. That is to say, the Scan Engine cannot run a single scan over a date range. For example, one may wish to run a scan for 52-week highs on the dates within the range of September 4th through 7th. Currently, this requires four separate scans using the appropriate date offsets.
Learn More: Scanning Over a Range of Dates
Checking Syntax
It's always a good idea to check the syntax before running your scan to ensure there are no errors to address. The Advanced Scan Workbench offers two ways to check your scan for syntax errors.
The Check Syntax Button
For error checking across the entire scan, just click the “Check Syntax” button below the Scan Editor Box.
If there is a syntax error, text will appear at the bottom of the box that identifies the problem. If you see the message below, you are ready to run the scan.
Your scan syntax is correct. Click "Run Scan" to view the results.
Note: If this is your main mode of error checking, we recommend clicking this button after each scan clause you add or modify to ensure there are no errors in that clause. Spotting a mistake after adding a single clause is usually much faster than trying to spot a mistake after entering twenty clauses.
In-Line Error Checking and Auto-Fixing
More recently, we have developed a second, more detailed, option for syntax checking in the Advanced Scan Workbench. Errors are now listed right next to the problem line of your scan, making it easy to figure out which line to fix. If you mouse over the red error or yellow warning icon to the left of the line, as shown below, a popup message will give you more detailed information about the problem. We've also added some warning messages, alerting you to potential problems that would not prevent your scan from running but may not give the results you intended. A drop-down menu at the bottom of the Scan Editor Box allows you to switch between showing errors only or both errors and warnings.

For selected errors, the workbench can now auto-fix the error for you with the click of a button. For example, if you leave out the “and” between two clauses, you will see a red error icon to the left of the line containing those clauses. If you mouse over the error icon, a message will pop up to inform you that you've left out the clause joiner and offering to fix it, as shown above. Simply click on the error icon to automatically insert the missing “and” into your scan.
Note: The In-Line Error Checking and Error Auto-Fixing features are not available on some older browsers, including all versions of Internet Explorer.
Running the Scan
To run the scan, simply click the green “Run Scan” button below the Scan Editor Box. The results will launch in a new tab or window for you to view.
Be sure to check out the Working with Scan Results article in the Support Center for more information on getting the most out of your scan results.
Scheduling Your Scan
In addition to running your scan manually, you can schedule your scan to run at a certain time each day. The scan results can be saved to a new or existing SharpCharts or ACP ChartList, and you will receive an email with a link to the scan results for that day.
To access Scheduled Scans from Your Dashboard, click the “Scheduled Scans” link in the “Member Tools” section or click the “More” button in the “Your Scans” section of the page and choose “Scheduled Scans”. You can also access Scheduled Scans from the Advanced Scan Workbench by clicking the Scheduled Scans tab at the top of the workbench.
The page allows you to schedule new scans and view/manage your existing scans, all from the same page:
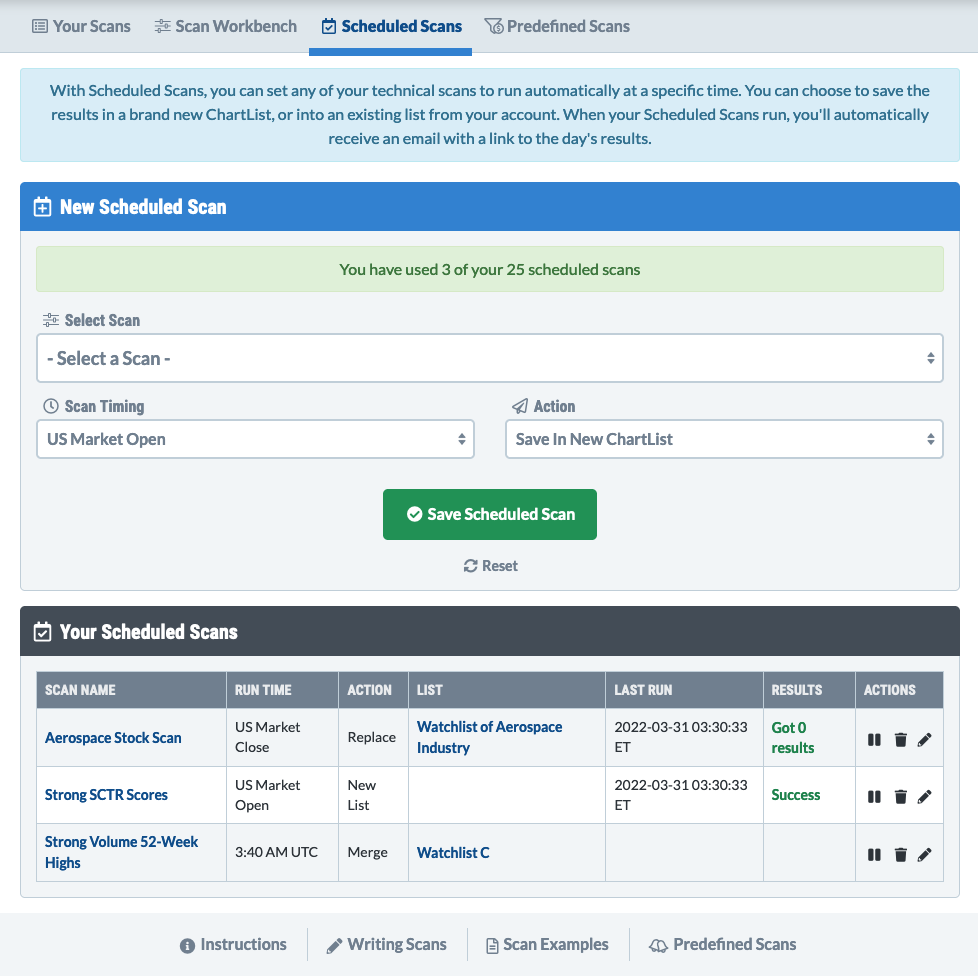
Scheduling a scan from the New Scheduled Scans section of the page takes four simple steps:
- Choose the saved scan that you would like to schedule from the dropdown list.
- Choose when you would like the scheduled scan to run each day (at the open or close of supported markets, or choose a custom time).
- Choose the location for the scan results (save in a new ChartList, or overwrite or merge with an existing ChartList).
- Click the green Save Scheduled Scan button.
Once your scheduled scan is saved, it will run automatically at the specified time and place the scan results in the SharpCharts or ACP ChartList you specified. You will receive an email with a link to the ChartList so you can view the scan results.
The Your Scheduled Scans section of the page will show all of the scans you have scheduled in a table with the following columns:
- Scan Name - shows the name of the scan you have scheduled. To edit the scan, click on its name to go to that scan in the Advanced Scan Workbench.
- Run Time - shows the time that the scan is scheduled to run each day (in UTC time).
- Action - specifies whether the results will be put in a new ChartList, or replace or merge with an existing ChartList.
- List - shows the name of the ChartList with a link to view the list in Summary View (or in StockChartsACP for ACP ChartLists).
- Last Run - shows the date and time that the scan was last run (in UTC time).
- Results - indicates whether or not the last run was successful. May also give more details about whether any results were returned and whether or not the results were truncated due to ChartList size limits.
- Actions - click the icons to play/pause the scheduled scan, delete the scheduled scan, or edit the scheduled scan, respectively.
Note: Extra members can schedule up to 10 scans, and Pro members can schedule up to 25 scans on their account. Basic members are not able to schedule scans.
Conclusions
The Advanced Scan Workbench is a powerful tool for creating, managing and running your scans. While it takes some time and effort to learn how to write effective scans, the Scan Components area and other features of the Advanced Scan Workbench can significantly lower the learning curve.