Table of Contents
Writing Scans Tutorial 1
This tutorial will walk you step-by-step through writing a simple scan to run from the Advanced Scan Workbench. Our scanning tutorials assume only a basic knowledge of common technical indicators and chart patterns. This tutorial may build on skills learned in prior scanning tutorials (links are provided where appropriate).
By the end of this tutorial, you will be able to write a simple scan that searches for US stocks with a certain RSI value and, subsequently, rank your results from highest to lowest RSI values. Once you've mastered these skills, you should be sure to check out our other scanning tutorials to learn about and practice other aspects of scanning.
Tip: We recommend printing out this page or opening it in another tab so that you can refer to it as you follow along on your computer.
Running the Default Scan
Step 1:
Open the Advanced Scan Workbench. When you first open the workbench, the following scan clauses will already have been added to your Scan Editor Box:
[type is stock] and [sma(20,volume) > 40000]
This scan looks for stocks that have averaged at least 40,000 shares of volume per day over the last 20 trading days. Let's break it down a little further.
There are two scan clauses in this scan:
- [type is stock]
- [sma(20,volume) > 40000]
Each scan clause must be enclosed in square brackets. A scan clause contains a simple true/false test to check against each symbol in the database. The first clause above simply checks to see if the symbol is a stock (as opposed to a mutual fund, index, etc.). If the symbol is a stock, then the clause is true; if not, the clause is false and the symbol will not appear in the scan results.
If you have multiple clauses in your scan, they must be joined together by putting “AND” or “OR” between the clauses. If you use “AND” to join them, that means both clauses must be true. If you use “OR” instead, only one of the clauses needs to be true. “OR” clauses can be especially tricky, so we will stick with “AND” clauses in this tutorial. To learn more about using “OR” clauses, please see our Support Center article on the topic.
Step 2:
Run this default scan in the Advanced Scan Workbench.
If you are not familiar with the process for running a scan in the Advanced Scan Workbench, we recommend accessing our tutorial on this topic, which will help you build and run the scan listed above.
Step 3:
A new browser window (or a new tab in your current browser window) should appear with a results page that looks like the one below.
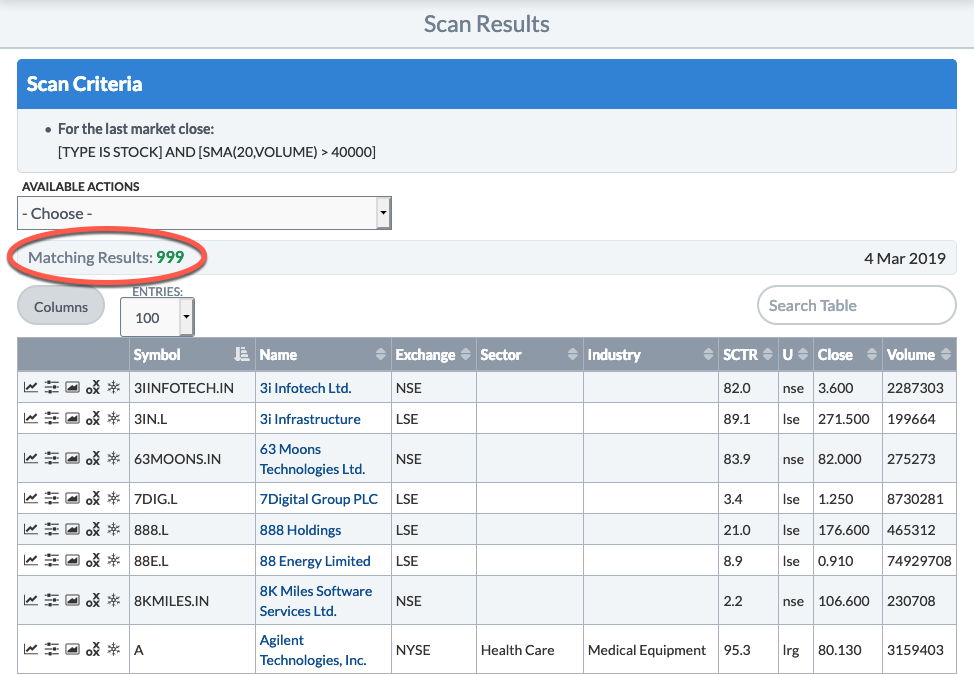
Notice that there are 999 results. This is the maximum number of results that you can get for your scan. In reality, there are thousands of stocks in our database that average at least 40,000 shares a day in volume. In order to narrow our focus, we'll need to add more clauses to our scan, which will give us a smaller set of relevant stocks in our scan results.
Note: At the time this tutorial was created, members were limited to 999 scan results; that limit is now 2000 results.
Adding Clauses to Define the Scan Universe
A quick way to narrow down the scan results is to add clauses that define the universe of symbols that you might invest in. Only interested in mutual funds? Indian stocks? Stocks traded on the Toronto Stock Exchange? S&P 500 stocks? Clauses can be added to limit your scan results to any of these requirements. For this tutorial, let's limit our results to US stocks.
Step 4:
Click in the Scan Editor Box and add the following text:
AND [country is US]
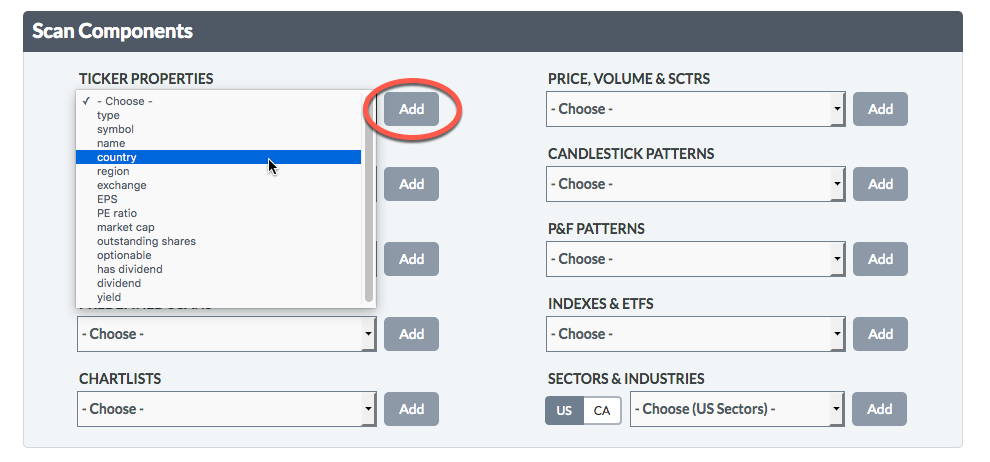
Note: You can also achieve the same effect by choosing “country” from the “Ticker Properties” menu in the Scan Components area of the workbench and click the “Add” button. This inserts a sample scan clause for limiting results to a specific country.
Step 5:
Click the “Check Syntax” button to make sure your scan clauses have been typed in correctly. This step is recommended after each clause you add. It is much easier to find a typo in one clause than in twenty clauses, so it's best to check your syntax regularly.
Another way to limit the universe of stocks is through simple price and volume tests. In this case, let's limit our universe to symbols where the current closing price is at least $80.
Step 6:
Choose “Close” from the “Price, Volume & SCTRs” menu in the Scan Components area and click the “Add” button.
Step 7:
Notice that the sample clause looks for symbols where the close is greater than 99.9. You can change this by typing in a different value in the Scan Editor Box. In this case, delete the “99.9” and replace it with “80” - your scan should now read like this:
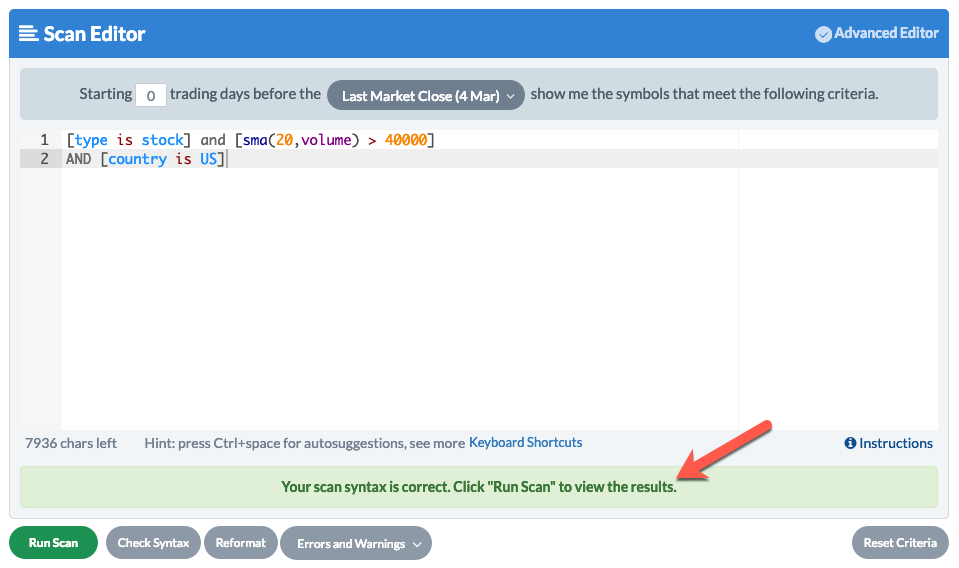
[type is stock] and [sma(20,volume) > 40000]
and [country is US]
and [Close > 80]
Step 8:
Click the “Check Syntax” button again to ensure all of the scan clauses are correct. Then, click “Run Scan” and check out the results.
The goal of defining the universe is to weed out large groups of symbols that you would never invest in anyways. The more of these you can exclude from your scan up front, the faster your scan will run against the remaining symbols. Many universe-defining sample clauses can be found in the Scan Components area, under the following menus:
- Ticker Properties
- Price, Volume & SCTRs
- Indexes & ETFs
- ChartLists
- Sectors & Industries
Adding Clauses to Scan for Technical Conditions
Once you've defined your universe, you want to scan for symbols in your universe that are experiencing specific technical conditions and signals. Are you interested in stocks that are overbought or oversold? Stocks having a MACD Crossover? Stocks that have just had a dragonfly doji? Clauses can be added to limit your scan results based on technical indicators, candlestick patterns, P&F patterns and more. For this tutorial, we will limit our results to stocks with an RSI value above 70.
Step 9:
Chose “RSI” from the “Technical Indicators” menu in the Scan Components area, area and click the “Add” button.
Now, your scan should read like this:
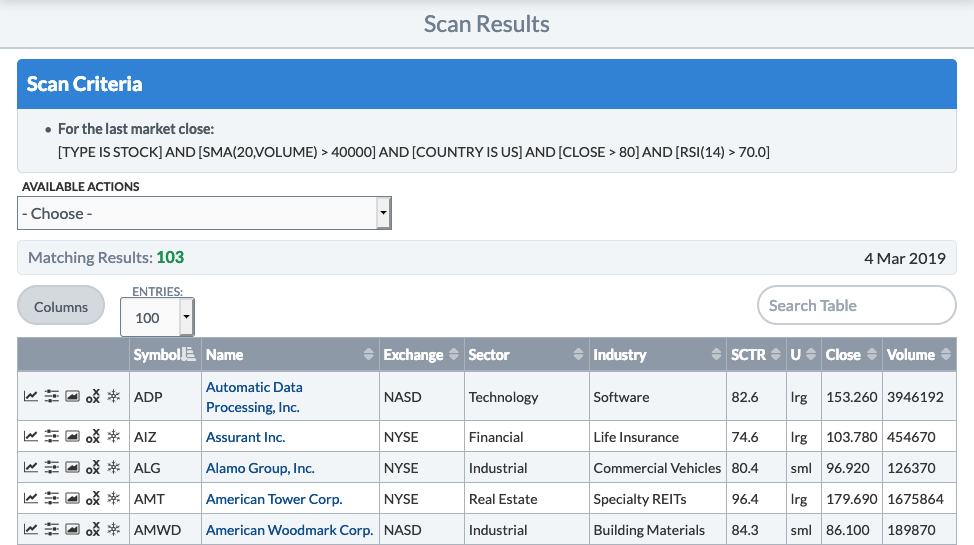
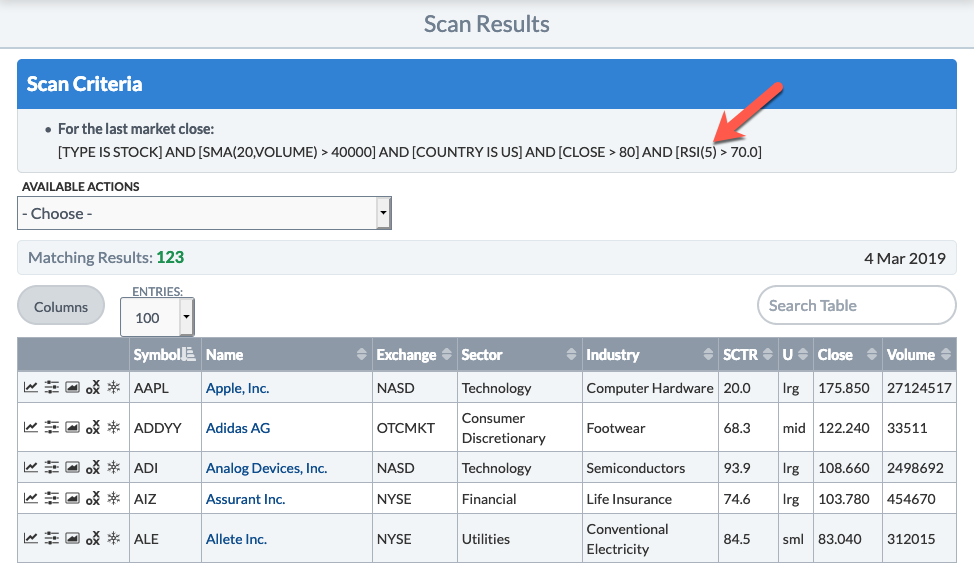
[type is stock] and [sma(20,volume) > 40000]
and [country is US]
and [Close > 80]
and [RSI(14) > 70.0]
Notice the number in parentheses after RSI. These parentheses are used to define certain parameters for technical indicators. In the case of RSI, there is one parameter that shows the number of periods to use in calculating the RSI value. By default, it is calculated with 14 periods, but you can change the number of periods by changing this parameter. Check out our Scan Syntax Reference for details on the parameters used for each technical indicator.
Step 10:
Click the “Check Syntax” button again to ensure all of the scan clauses are correct. Then, click “Run Scan” and check out the results.
Step 11:
Try changing to a 5-period RSI by clicking in the Scan Editor Box, deleting the “14” and replacing it with a “5” instead. Now, that clause should read like this:
and [RSI(5) > 70.0]
Step 12:
Click the “Check Syntax” button again, then click “Run Scan” and check out the results. Have the results changed from the 14-period RSI scan?
Many technical condition/signal sample clauses can be found in the Scan Components Area, under the following menus:
- Technical Indicators
- Candlestick Patterns
- Candlestick Building Blocks
- P&F Patterns
- Predefined Scans
Adding a RANK BY Clause
Adding a special RANK BY clause allows you to view and sort your scan results by a value that is not normally included in the scan results table. This is commonly used to see the values for a technical indicator signal or condition without having to a launch a chart for each one. Let's add a rank by clause for RSI(5), the technical condition that we're scanning for in our current scan.
Step 13:
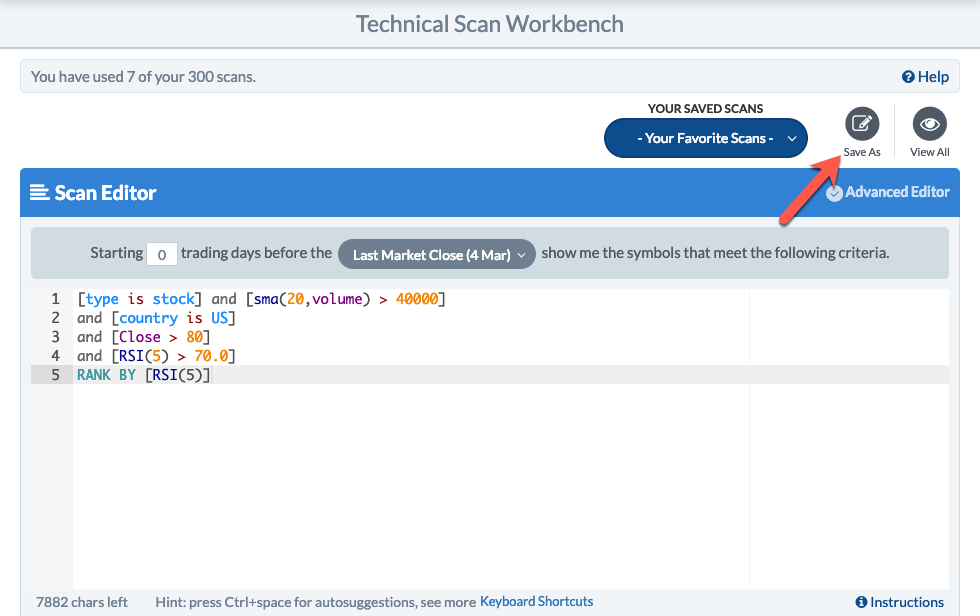
Click in the Scan Editor Box. At the end of your scan, start a new line and type the following text:
RANK BY [RSI(5)]
Step 14:
Click the “Check Syntax” button again, then click “Run Scan” and check out the results. Notice the new column at the right side of the scan results table, showing the RSI(5) value.

Saving Your Scan
When you're happy with your scan, you should save the scan syntax. This way, you can run it again at a later date without having to reenter all the clauses.
Step 15:
On the Advanced Scan Workbench, click the “Save As” button above the Scan Editor Box.
Step 16:
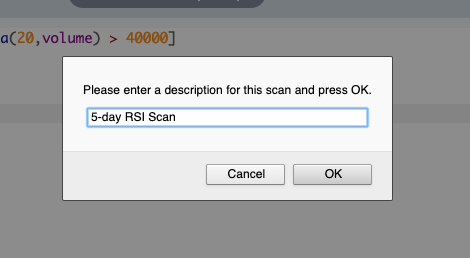
Choose a name for your saved scan, and click “OK”. In this tutorial, we will use “5-day RSI Scan” as the name for our saved scan.
Step 17:
To load this saved scan and use it at a later date, simply select it from the “Your Saved Scans” menu above the Scan Editor Box.

Learn More
Now that you've mastered the basics of writing scans, check out our second Writing Scans Tutorial and learn more about how to create more complex scans.
For more in-depth information on writing scans, please check out our Writing Scans article in the Support Center.