Table of Contents
Technical Alert Workbench
Overview
The Technical Alert Workbench allows StockCharts members to create, modify, and schedule custom technical alerts that meet whatever technical criteria are desired. Once a custom alert is scheduled in our system, it will periodically run against all the ticker symbols in our database and if a user-determined number of symbols match the alert's criteria, the user will receive a notification via either email, SMS text message, or an alert box on the SharpCharts Workbench page.
Two different types of technical alerts can be created using the Technical Alert Workbench:
- The Price Alert Builder will assist you in quickly creating alerts for basic price crossovers. If you want to be notified when a single symbol crosses above or below a specific price, then this is the alert type for you.
- Our Advanced Alert Builder allows you to create more complex custom alerts. This builder is similar to the Advanced Scan Workbench, allowing you to select and insert multiple technical criteria for your alert easily.
Accessing the Alert Workbench
To access the Technical Alert Workbench, click on “Your Dashboard” at the top of any page and log in to your account. From Your Dashboard, you can click the “Technical Alert Workbench” link in the Member Tools section of the page, or click the “New Alert” button in the Your Alerts section.
Once on the workbench, the “Alert Type” buttons at the top left will allow you to choose which type of alert you want to create. To create a Price Alert, select “Price” as the alert type; for an Advanced Alert, choose “Advanced” instead.
Parts of the Alert Workbench
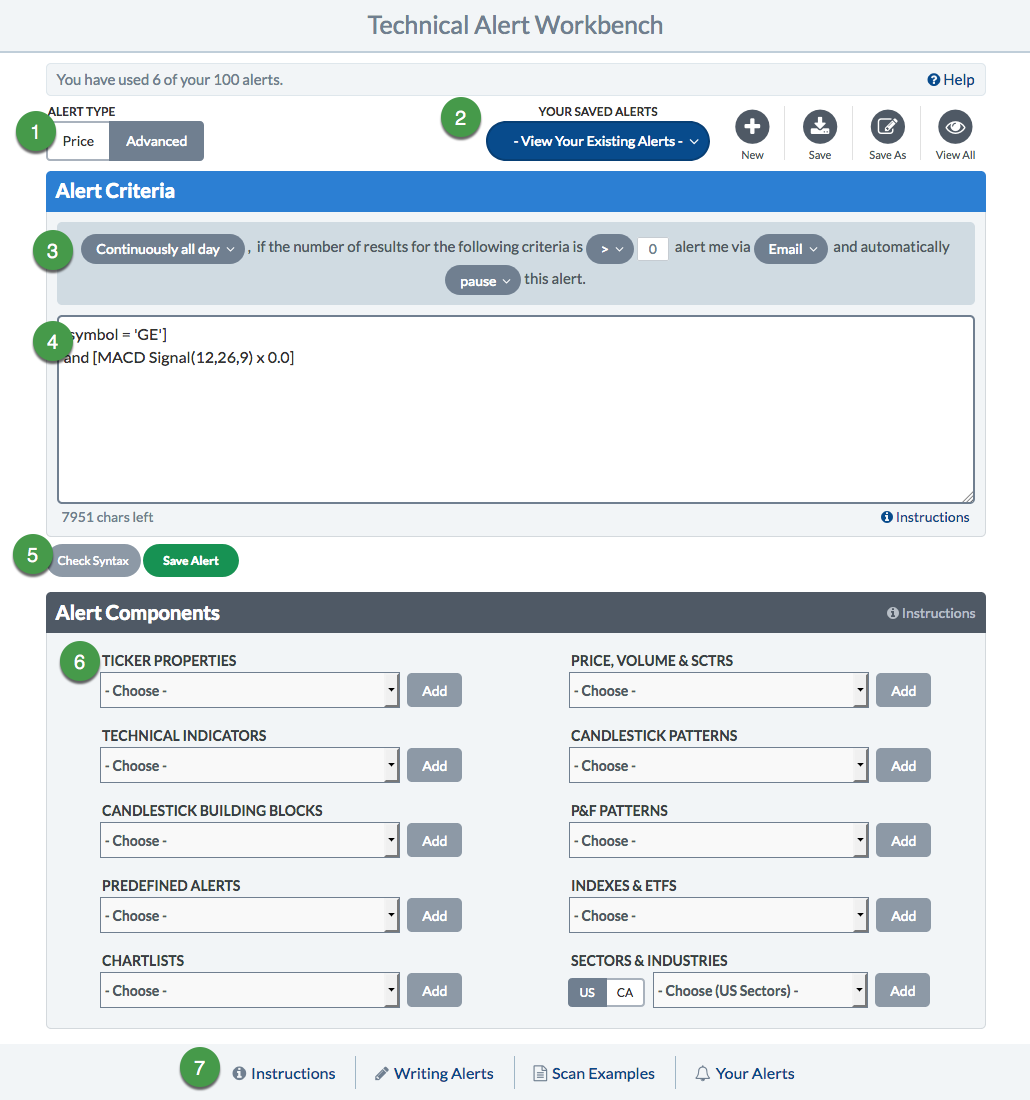
- Alert Type Buttons
- Alert Management
- Notification Controls (in Alert Criteria Panel)
- Alert Criteria Box (in Alert Criteria Panel)
- Check Syntax Button
- Alert Components Area
- Additional Resources
The use of each of these sections is described below.
Note: This screenshot shows the Advanced Alert Builder, which is used for creating complex alerts. The much simpler Price Alert Builder will be covered below.
Building an Advanced Alert
For Advanced Alerts, writing alert criteria is just like writing scan criteria. You can type in your criteria in the Alert Criteria Box by hand or, alternatively, insert commonly-used criteria from the Alert Components area.
The Alert Criteria Box and Alert Components areas are identical to the Scan Criteria Box and Scan Components areas in the Advanced Scan Workbench. Please see those topics for more information.
Just like building scans, it's always a good idea to check the syntax one last time before scheduling your alert in order to make sure that there are no errors in your alert criteria. To do this, just click the “Check Syntax” button below the Alert Criteria Box. If there is a syntax error, text will appear below the box that identifies the problem.
If you see the message below, it means you are ready to schedule your alert.
Your alert syntax is correct. Click "Save/Save As" to save your alert.
Notification Settings
One of the key differences between scans and alerts is that alerts, unlike scans, are run automatically at a scheduled time and notify you based on the number of securities that meet your criteria at that time.

The notification controls in the Alert Criteria Panel allow you to specify when the alert is run, what number of results will trigger the alert, how you should be contacted when the alert triggers and what to do with the alert once it has been triggered. The following sections will cover each of these topics.
Alert Timing
You can choose from four different schedules for your alert:
- Continuously All Day - alert runs continuously throughout the day. This is the default option.
- At Market Open - alert runs immediately after the first price update of the day.
- Hourly (10 AM to 4 PM) - alert runs the first time alerts are processed during each hour, from 10 AM - 4 PM Eastern. Note that, depending on the timing of the alert scans, this could be anywhere from the top of the hour to approximately 5 minutes after the hour.
- At Market Close - alert runs immediately after the market has closed.
A final run occurs at approximately 7-8 PM Eastern time. See our Alert Processing documentation for more details.
Number of Results
Alerts are triggered based on the number of securities that meet your alert criteria. Very often, you are looking for a single event, such as the price of a particular stock going above or below some value. In this case, you want to be alerted if the result set is greater than 0, which is the default.
For other scans, you may wish to know if some level has been passed. For example, you could build your own Bullish Percent Index by adding a known number of symbols to a ChartList and scanning to see how many symbols have collectively crossed above or below a specific threshold.
The Notification Controls allow you to specify the number of results, as well as the comparison method, to tailor the alert.
Contact Methods
When your alert is triggered, you can choose to be notified either by email, SMS text message, or a notification banner in the SharpCharts Workbench.
For email, we will use the email address we have on file for your account. You can change your email address by visiting the Your Account page.
Make sure StockCharts.com is listed as a trusted site in your email program so that messages aren't caught in junk filters. You may want to check your internet service provider's or email program's documentation to set up junk filters.
Note: If you select the email option, the notification email will show only the first 100 symbols that match your alert criteria.
SMS
SMS text messages will use the phone number on file for your account. When you set up an SMS alert, an “Update SMS Number” link will appear at the top of the Alert Workbench. Click this link to change your phone number.

If you live in the US or Canada, you can specify your area code and phone number. If you live outside the US or Canada, you must also prepend the number with a “+” sign, the country code, and any regional codes:
- +353 1 XXX-XXXX - Dublin, Ireland
- +44 20 XXXX-XXXX - London, England
- +81 6 XXXX-XXXX - Osaka, Japan
Workbench
If the alert is set to “Workbench,” the notification will appear at the top of the SharpCharts Workbench page as a banner. The alert will display for one day or until the alert is hidden via the “Hide” button on the banner. Note that on the Workbench, only two banners appear at a time. If you have more than two alerts, close one (click on the X), and another alert will display.
Alert State
After an alert has been triggered, you have the following options for future scheduled runs of the alert:
- Pause - the alert will not be processed again until the alert state has been set to run again. Use the Alert Center page to toggle the run state between running and paused.
- Delete - the alert is automatically deleted.
- Continue - the alert will continue to run according to the user-specified schedule.
Once you've built your alert and chosen your notification settings, click the green “Save Alert” button and choose a name for your alert.
Learn More: Alert Center
Working with Advanced Alert Results
When your advanced alert is triggered, the notification you receive (whether via email, SMS, or workbench banner) will include a link to a webpage showing the symbols that were returned by your advanced alert (up to a maximum of 2000 symbols). The link will remain valid for 1 week.
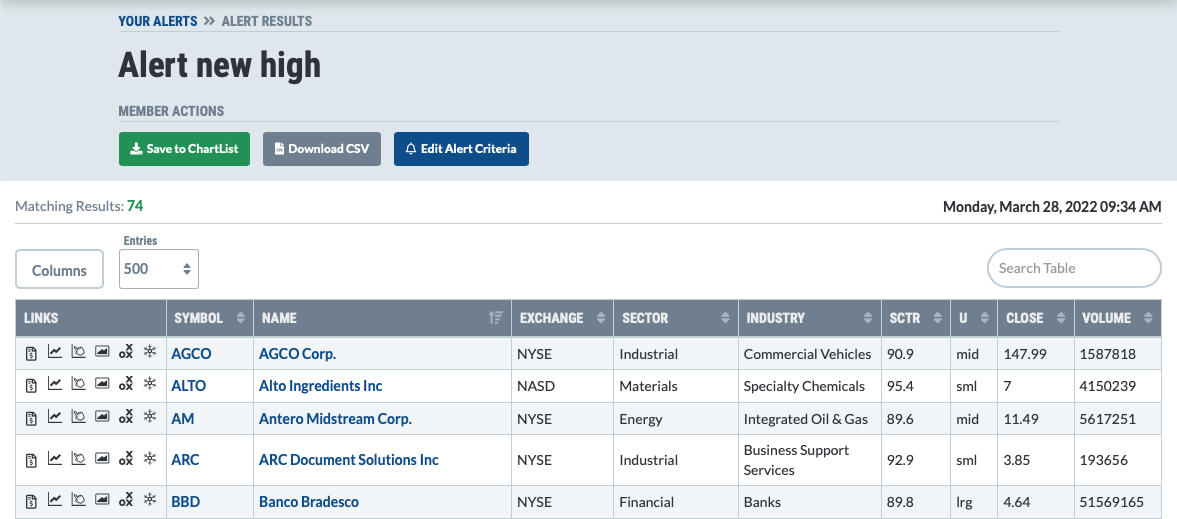
The alert results page is similar to the scan results page, and you can take many of the same actions from there. Symbols are listed in a table along with basic information including price, volume, and SCTR score. The table can be sorted and searched. Use the links at the left side of the table to launch different charts for each symbol.
Buttons at the top of the table allow Extra and Pro members to save the alert results in a new SharpCharts or ACP ChartList, replace or merge with an existing SharpCharts or ACP ChartList, or download to CSV. Click the Blue “Edit Alert Criteria” button to open the alert in the Technical Alert Workbench and modify the alert.
Reminder: Just like with scans, 2000 is the maximum number of symbols that can be shown in the results. If 2000 or more results are returned by your alert, only the first 2000 results will be shown on this page. A notification will be displayed at the top of the page indicating that your alert results may have been truncated.
Learn More: Working with Scan Results
Building a Price Alert
The process for creating Price Alerts is much simpler than that for Advanced Alerts. To access the Price Alert Builder, click the “Price Alert” button at the top left of the Technical Alert Workbench.
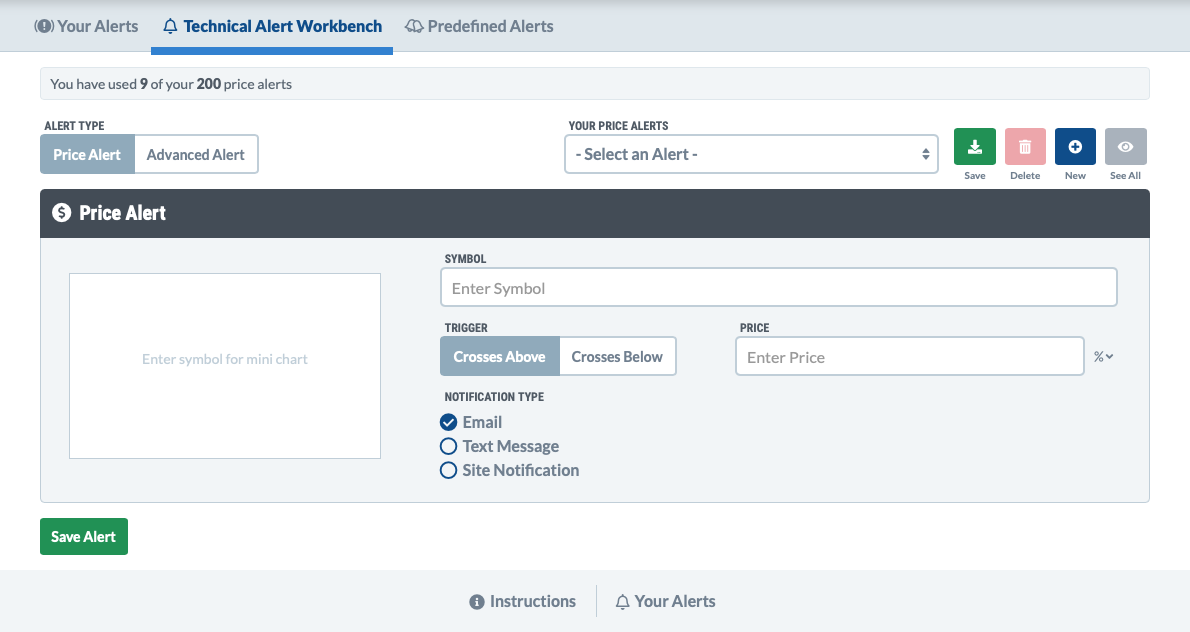
Next, choose your contact method(s): email, SMS text message, or a notification banner on the SharpCharts Workbench. (Note that the contact method is the only notification setting that needs to be set on a price alert.) These contact methods work exactly the same as they do for Advanced Alerts.
Then, choose the symbol that you want to watch for price crossovers. A mini-chart will be shown for that symbol and the crossover price field will automatically be filled with the current price.
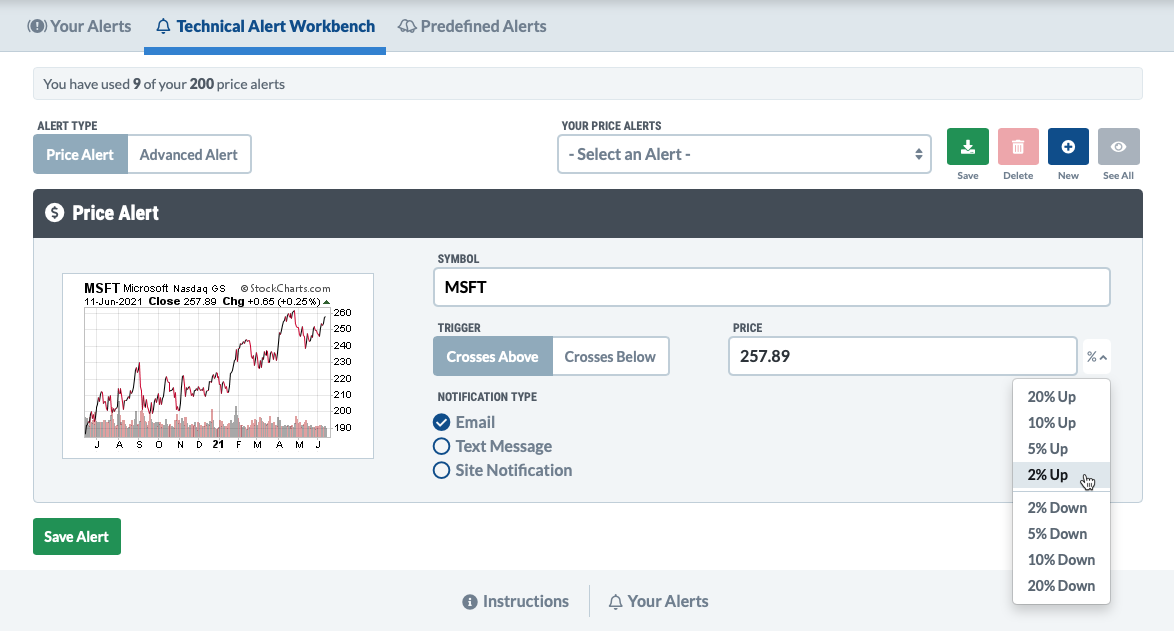
By default, the alert will look for the price to cross above that level, but, if you would like to be notified when it crosses below a certain level, simply click the “Below” button.
The crossover price can be adjusted manually, but you can also use the “%” dropdown menu to specify a certain percentage change (e.g. 2% Up). The price that corresponds with that percentage change is calculated for you and entered in the crossover price field.
Once you've filled in all the fields, click the green “Save Alert” button to save your new Price Alert.
Managing Alerts
Whether you are creating an Advanced Alert or a simple Price Alert, you must save the alert before it can be run. This can be done by clicking the green “Save Alert” button.
Basic users can save just 1 Advanced Alert and 2 Price Alerts, while Extra members can have up to 100 Advanced and 200 Price Alerts, and Pro members can have up to 250 Advanced and 500 Price Alerts on their account. The number of alerts you have available will be displayed at the top of the Alert Workbench.

The Alert Management area of the Alert Workbench allows you to add, modify, delete and view your saved alerts.
When you first create a new alert, you can save it by clicking the “Save” icon (“Save As” for Advanced Alerts) in the Alert Management area or the green “Save Alert” button below. For Advanced Alerts, you will be prompted to enter a name for your alert and, once you have done so, click “OK”. Alert names are automatically-generated for Price Alerts.
To load a saved alert in the Alert Workbench later, click the “View Your Existing Alerts” dropdown menu in the Alert Management area and find your alert on the list. You can tell which saved alert is loaded in the Alert Builder because the name of the currently-loaded alert will be displayed in this dropdown menu.
Note: Make sure to save any changes to your current alert before switching to another one or creating a new one.
If you make changes to your saved alert, you can save the changes by clicking the “Save” icon in the Alert Management area or the green “Save Alert” button below. For Advanced Alerts, if you want to save a copy of your alert instead, you can choose the “Save As” icon and specify a different name for the new copy of the alert.
In the event that you no longer need an alert, you can delete it by loading it in the Alert Builder and then clicking the “Delete” icon in the Alert Management area.
To view all your saved alerts and their statuses on a single page, click the “View All” icon in the Alert Management area. This will load the Alert Center page. Please see our Alert Center article in the Support Center to learn more.